The OpenAPI Specification (OAS) defines a standard, language-agnostic interface to RESTful APIs which allows both humans and computers to discover and understand the capabilities of the service without access to source code, documentation, or through network traffic inspection. When properly defined, a consumer can understand and interact with the remote service with a minimal amount of implementation logic.
介绍
Swagger首先当然是作为一款强大的API文档工具所存在的,其次在在接口测试方面对开发人员提供了非常大的便利,所以,可视化RESTFU风格的web服务。开发文档,并且支持做测试的一款中间软件。
对于后端开发来说,不用手写接口拼大量的参数,防止出错,全注解方式,开发简单方便
对于测试来说,不需要前端UI功能就可以对接口直接测试,放弃了使用已久的postman
对于前端来说,后端只需定义好接口,会自动生成文档,接口功能、参数一目了然
整合 Swagger
1 2 3 4 5 6 7 8 9 10 <dependency > <groupId > io.springfox</groupId > <artifactId > springfox-swagger2</artifactId > <version > 2.7.0</version > </dependency > <dependency > <groupId > io.springfox</groupId > <artifactId > springfox-swagger-ui</artifactId > <version > 2.7.0</version > </dependency >
1
2
3
4
5
6
7
8
9
10
11
12
13
14
15
16
17
18
19
20
21
22
23
24
25
26
27
28
29
30
31
32
33
34
35
36
37
38
39
40
41
42
43
44
45
46
47
48
49
50
51
52
53
package com.zby.config;import org.springframework.context.annotation.Bean;import org.springframework.context.annotation.Configuration;import springfox.documentation.builders.ApiInfoBuilder;import springfox.documentation.builders.PathSelectors;import springfox.documentation.builders.RequestHandlerSelectors;import springfox.documentation.service.ApiInfo;import springfox.documentation.spi.DocumentationType;import springfox.documentation.spring.web.plugins.Docket;import springfox.documentation.swagger2.annotations.EnableSwagger2;@Configuration @EnableSwagger2 public class Swagger2Config @Bean public Docket createRestApi () return new Docket(DocumentationType.SWAGGER_2) .apiInfo(apiInfo()) .select() .apis(RequestHandlerSelectors.basePackage("com.zby.controller" )) .paths(PathSelectors.any()) .build(); } private ApiInfo apiInfo () return new ApiInfoBuilder() .title("Spring Boot中使用Swagger2构建RESTful APIs" ) .description("更多请关注https://www.byzhao.cn" ) .termsOfServiceUrl("https://www.byzhao.cn" ) .version("1.0" ) .build(); } }
@EnableSwagger2注解开启 Swagger
1
2
3
4
5
6
7
8
9
10
11
12
13
14
15
16
17
18
19
20
21
22
23
24
25
26
27
28
29
30
31
32
package com.zby;import com.zby.util.IdWorker;import org.springframework.boot.SpringApplication;import org.springframework.boot.autoconfigure.SpringBootApplication;import org.springframework.cloud.client.discovery.EnableDiscoveryClient;import org.springframework.cloud.netflix.eureka.EnableEurekaClient;import org.springframework.cloud.openfeign.EnableFeignClients;import org.springframework.context.annotation.Bean;import org.springframework.security.crypto.bcrypt.BCryptPasswordEncoder;import org.springframework.web.servlet.config.annotation.WebMvcConfigurationSupport;import springfox.documentation.swagger2.annotations.EnableSwagger2;@EnableDiscoveryClient @SpringBootApplication @EnableFeignClients @EnableSwagger2 public class UserinfoApplication extends WebMvcConfigurationSupport public static void main (String[] args) SpringApplication.run(UserinfoApplication.class, args); } @Bean public IdWorker idWorker () return new IdWorker(1 ,1 ); } @Bean public BCryptPasswordEncoder bCryptPasswordEncoder () return new BCryptPasswordEncoder() ; } }
最后,对接口进行api文档注解,不进行注解也会由相关的api,但是没有接口的详细描述,只有开发人员可以看懂。 (为了看清整个类的结构,这里贴出全部代码,下面我们只对apiTest方法进行详细解释)
1
2
3
4
5
6
7
8
9
10
11
12
13
14
15
16
17
18
19
20
21
22
23
24
25
26
27
28
29
30
31
32
33
34
35
36
37
38
39
40
41
42
43
44
45
46
47
48
49
50
51
52
53
54
55
56
57
58
59
60
61
62
63
64
65
66
67
68
69
70
71
72
73
74
75
76
77
78
79
80
81
82
83
84
85
86
87
88
89
90
91
92
93
94
95
96
97
98
99
100
101
102
103
104
105
106
107
108
109
110
111
112
113
114
115
116
117
118
119
120
121
122
123
124
125
126
127
128
129
130
131
132
133
134
135
136
137
138
139
140
141
142
143
144
145
146
147
148
149
150
151
152
153
154
155
156
package com.zby.controller;import com.zby.client.client;import com.zby.entity.Result;import com.zby.entity.User;import com.zby.service.UserService;import com.zby.util.IdWorker;import com.zby.util.JwtUtil;import io.netty.handler.codec.json.JsonObjectDecoder;import io.swagger.annotations.Api;import io.swagger.annotations.ApiImplicitParam;import io.swagger.annotations.ApiImplicitParams;import io.swagger.annotations.ApiOperation;import org.springframework.beans.factory.annotation.Autowired;import org.springframework.beans.factory.annotation.Value;import org.springframework.cloud.context.config.annotation.RefreshScope;import org.springframework.stereotype.Controller;import org.springframework.web.bind.annotation.*;import org.springframework.web.servlet.ModelAndView;import javax.servlet.http.HttpServletRequest;import javax.servlet.http.HttpServletResponse;import javax.servlet.http.HttpSession;import java.util.HashMap;@RefreshScope @Controller @RequestMapping("user") @Api(value = "api测试接口") public class UserController @Autowired private UserService userservice; @Autowired private IdWorker idWorker; @Autowired private JwtUtil jwtUtil; @Autowired private client client; @Value("${zby.name}") private String name; @Value("${zby.age}") private String age; @Value("${zby.sex}") private String sex; @GetMapping("hello") public String hello () System.out.println(name); return "user_login" ; } @ResponseBody @PostMapping("register") public Result register (@RequestBody User user) user.setId(idWorker.nextId() + "" ); user.setActive(false ); String register = userservice.register(user); if (register != null register != "" ){ return new Result(true ,20000 ,"注册成功" ,register); } return new Result(false ,20001 ,"注册失败" ,"error" ); } @ResponseBody @PostMapping("login") public Result login (@RequestBody User user, HttpServletRequest request, HttpServletResponse response) User login = userservice.login(user); if (login != null ){ HttpSession session = request.getSession(); session.setAttribute("username" ,login.getUsername()); String token = jwtUtil.creatJWT(login.getId(), login.getUsername(), String.valueOf(login.getType())); System.out.println(token); return new Result(true ,20000 ,"登录成功" ,login); } return new Result(false ,20001 ,"登录失败" ,"error" ); } @GetMapping("config") public ModelAndView Config () HashMap<String, String> map = new HashMap<String, String>(); map.put("name" ,name); map.put("age" ,age); map.put("sex" ,sex); Result result = new Result(true , 20000 , "成功" , map); return new ModelAndView("config_test" ,"result" ,result); } @ResponseBody @ApiOperation(value="查询用户数据", notes="根据用户username查询用户数据") @GetMapping("apiTest") @ApiImplicitParams({ @ApiImplicitParam(paramType="query", name = "username", value = "用户名", required = true, dataType = "PathVariable") }) public Result apiTest (String username) User user = userservice.query(username); return new Result(true ,20000 ,"查询成功" , user.getId() + " 邮箱:" + user.getEmail() + " 联系电话:" + user.getPhone() + " 年龄:" + user.getAge() ); } @ResponseBody @GetMapping(value = "view") public ModelAndView view (HttpServletRequest request) return client.view(request); } @ResponseBody @GetMapping(value = "test") public String test () return client.test(); } }
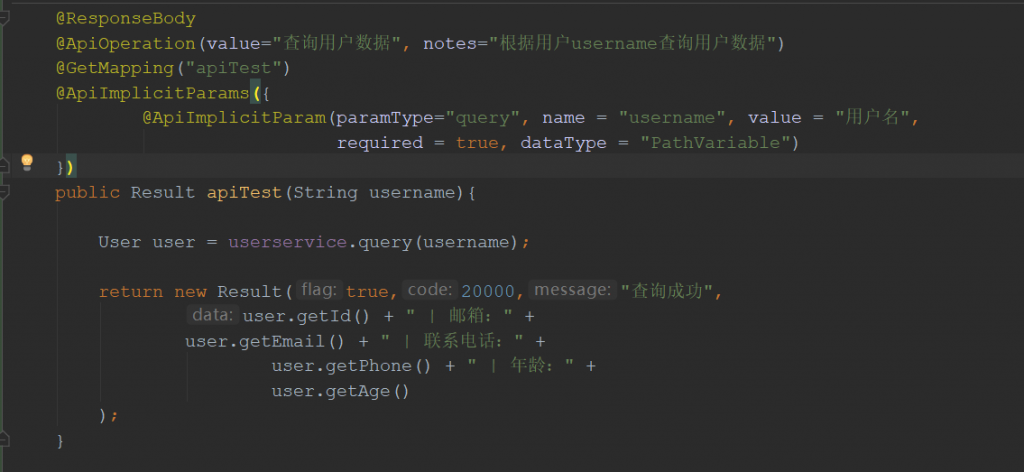
OK!到这里准备工作已经结束了,我们先来具体看一下apiTest方法
1
2
3
4
5
6
7
8
9
10
11
12
13
14
15
16
17
@ResponseBody @ApiOperation(value="查询用户数据", notes="根据用户username查询用户数据") @GetMapping("apiTest") @ApiImplicitParams({ @ApiImplicitParam(paramType="query", name = "username", value = "用户名", required = true, dataType = "PathVariable") }) public Result apiTest (String username) User user = userservice.query(username); return new Result(true ,20000 ,"查询成功" , user.getId() + " 邮箱:" + user.getEmail() + " 联系电话:" + user.getPhone() + " 年龄:" + user.getAge() ); }
注解解释
@Api:用在类上,说明该类的作用。例如:
@ApiOperation:注解来给API增加方法说明。例如:
@ApiImplicitParams: 用在方法上包含一组参数说明。
@ApiImplicitParam:用来注解来给方法入参增加说明。
@ApiResponses:用于表示一组响应
@ApiResponse:用在@ApiResponses中,一般用于表达一个错误的响应信息
code :数字,例如400
message :信息,例如”请求参数没填好”
response :抛出异常的类
@ApiModel:描述一个Model的信息(一般用在请求参数无法使用@ApiImplicitParam注解进行描述的时候)
@ApiModelProperty :描述一个model的属性
注意:@ApiImplicitParam的参数说明:
paramType :指定参数放在哪个地方
header:请求参数放置于Request Header,使用@RequestHeader获取query:请求参数放置于请求地址,使用@RequestParam获取path:(用于restful接口)–>请求参数的获取:@PathVariablebody:(不常用)form(不常用)name:参数名dataType:参数类型required:参数是否必须传value:说明参数的意思defaultValue:参数的默认值
折腾这么久,启动!
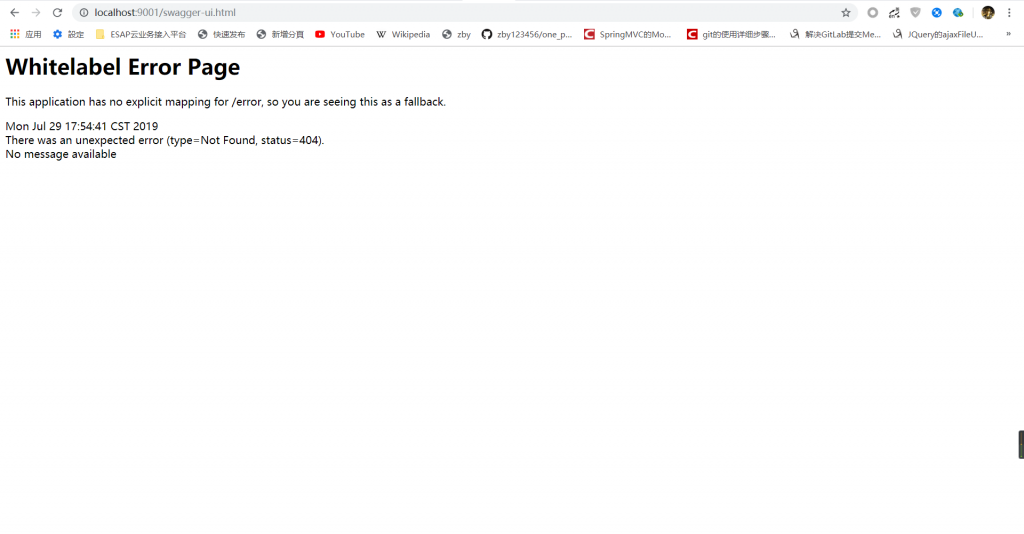
直接访问 http://localhost:9001/swagger-ui.html 即可!
额。。。。404!
问题分析
分析:让我们回想一下这个问题会是什么原因引起的!从控制台中我们可以看到一些端倪
没有/sagger-ui.html的映射
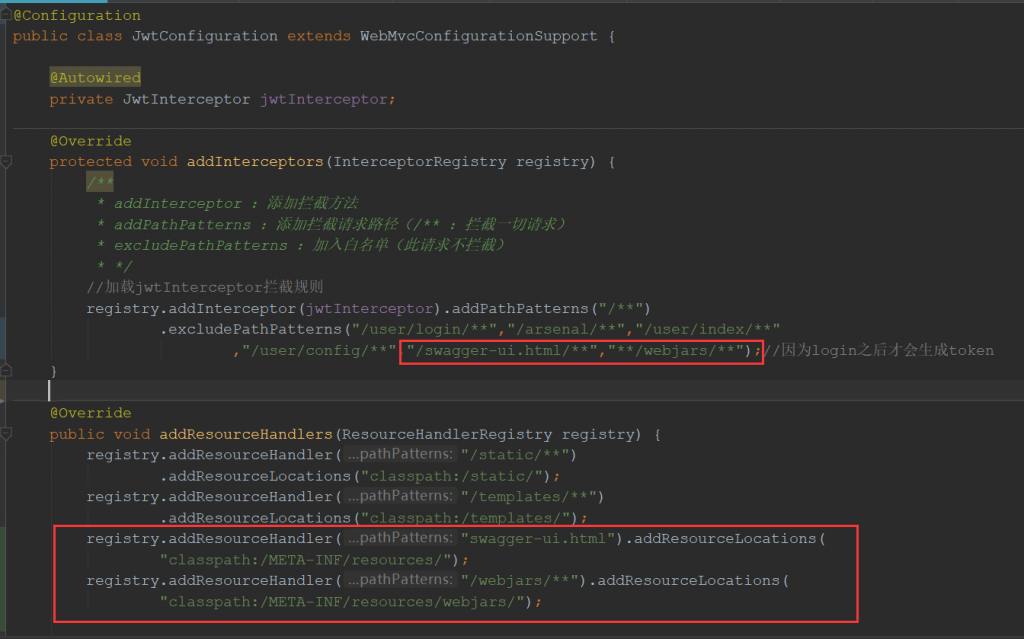
那我们肯定第一时间会想到是WebMvcConfigurationSupport的原因
那。。。。那就直接注释掉@Configuration,虽然这可以解决问题,但是会直接影响到我拦截器的工作,突然想到以前我记录过关于“SpringBoot中拦截器拦截静态资源问题(thymeleaf)”这篇文章,这问题不是如出一辙么!(可见笔记的重要性)
解决问题 1 2 3 4 5 6 7 8 9 10 11 12 13 14 15 16 17 18 19 20 21 22 23 24 25 26 27 28 29 30 31 32 33 34 35 36 37 38 39 40 41 42 43 44 45 46 package com.zby.config;import com.zby.interceptor.JwtInterceptor;import org.springframework.beans.factory.annotation.Autowired;import org.springframework.context.annotation.Configuration;import org.springframework.stereotype.Component;import org.springframework.web.servlet.config.annotation.CorsRegistry;import org.springframework.web.servlet.config.annotation.InterceptorRegistry;import org.springframework.web.servlet.config.annotation.ResourceHandlerRegistry;import org.springframework.web.servlet.config.annotation.WebMvcConfigurationSupport;@Component @Configuration public class JwtConfiguration extends WebMvcConfigurationSupport @Autowired private JwtInterceptor jwtInterceptor; @Override protected void addInterceptors (InterceptorRegistry registry) registry.addInterceptor(jwtInterceptor).addPathPatterns("/**" ) .excludePathPatterns("/user/login/**" ,"/arsenal/**" ,"/user/index/**" ,"/user/config/**" ,"/swagger-ui.html/**" ,"**/webjars/**" ); } @Override public void addResourceHandlers (ResourceHandlerRegistry registry) registry.addResourceHandler("/static/**" ) .addResourceLocations("classpath:/static/" ); registry.addResourceHandler("/templates/**" ) .addResourceLocations("classpath:/templates/" ); registry.addResourceHandler("swagger-ui.html" ).addResourceLocations( "classpath:/META-INF/resources/" ); registry.addResourceHandler("/webjars/**" ).addResourceLocations( "classpath:/META-INF/resources/webjars/" ); super .addResourceHandlers(registry); } }
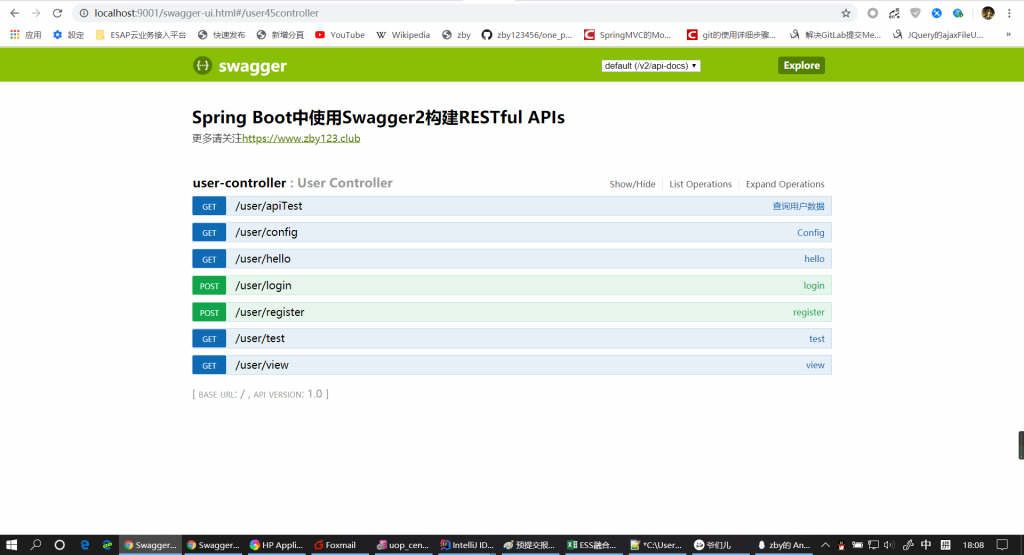
http://localhost:9001/swagger-ui.html
结论
spring boot是简化了spring的一些配置,并且帮开发者管理jar包版本,自动生成bean,方便开发者。但是这也带来了一些恶果,强大的封装造成有些问题不好排查,想做一些改动引起很大的问题。
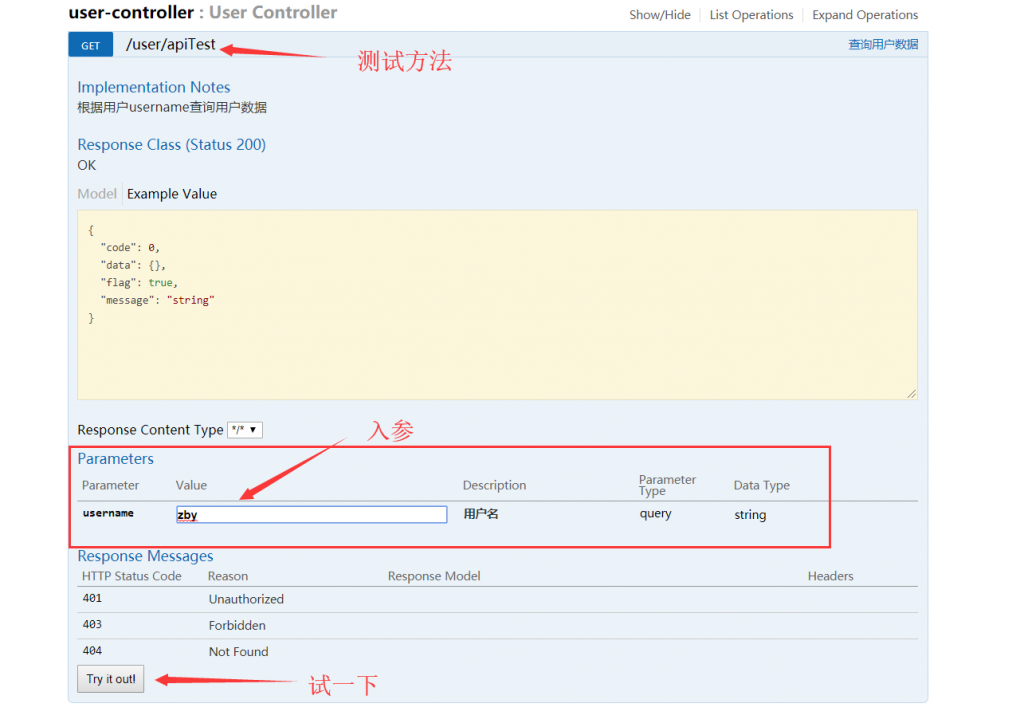
打开第一个apiTest
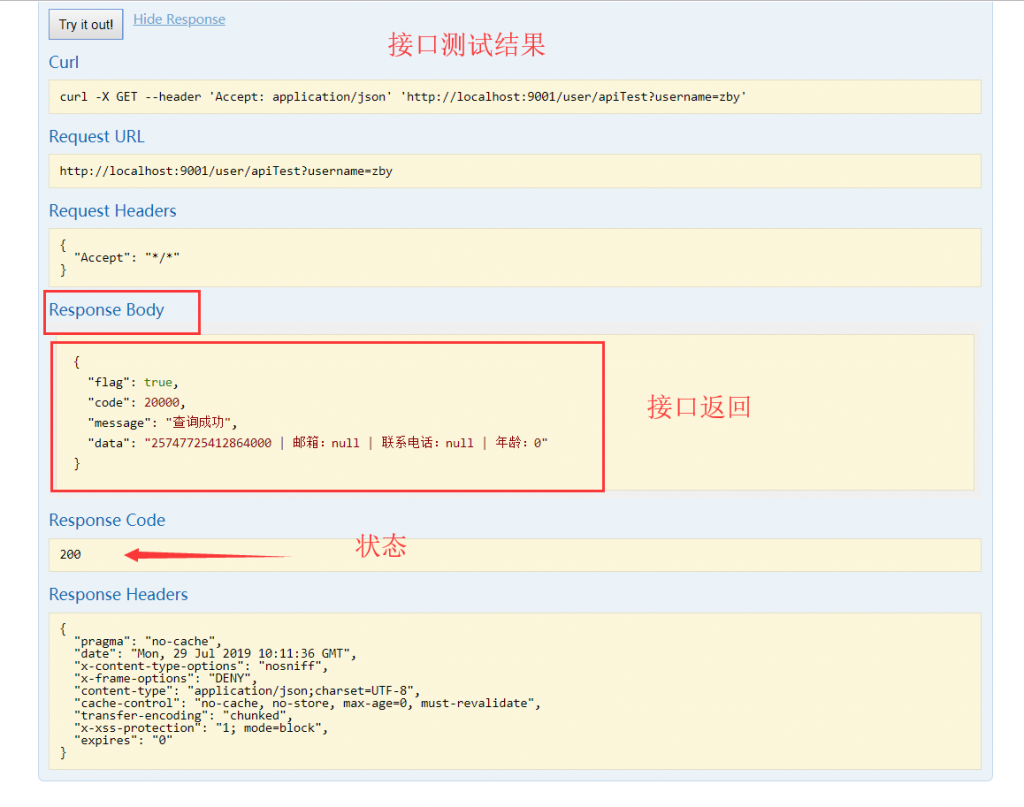
测试一下
注意: 现在很多请求需要在header增加额外参数,可以参考如下做法, 使用request接收
1 @ApiImplicitParam(paramType="header", name = "token", value = "token", required = true, dataType = "String")
1 String token = request.getHeader("token");
